How to Adjust Brightness and Contrast of Photos Online: Complete Guide 2026
Learn how to adjust brightness, contrast, exposure, shadows and highlights in photos online for free. Fix dark, overexposed or flat images directly in your browser — no software needed.
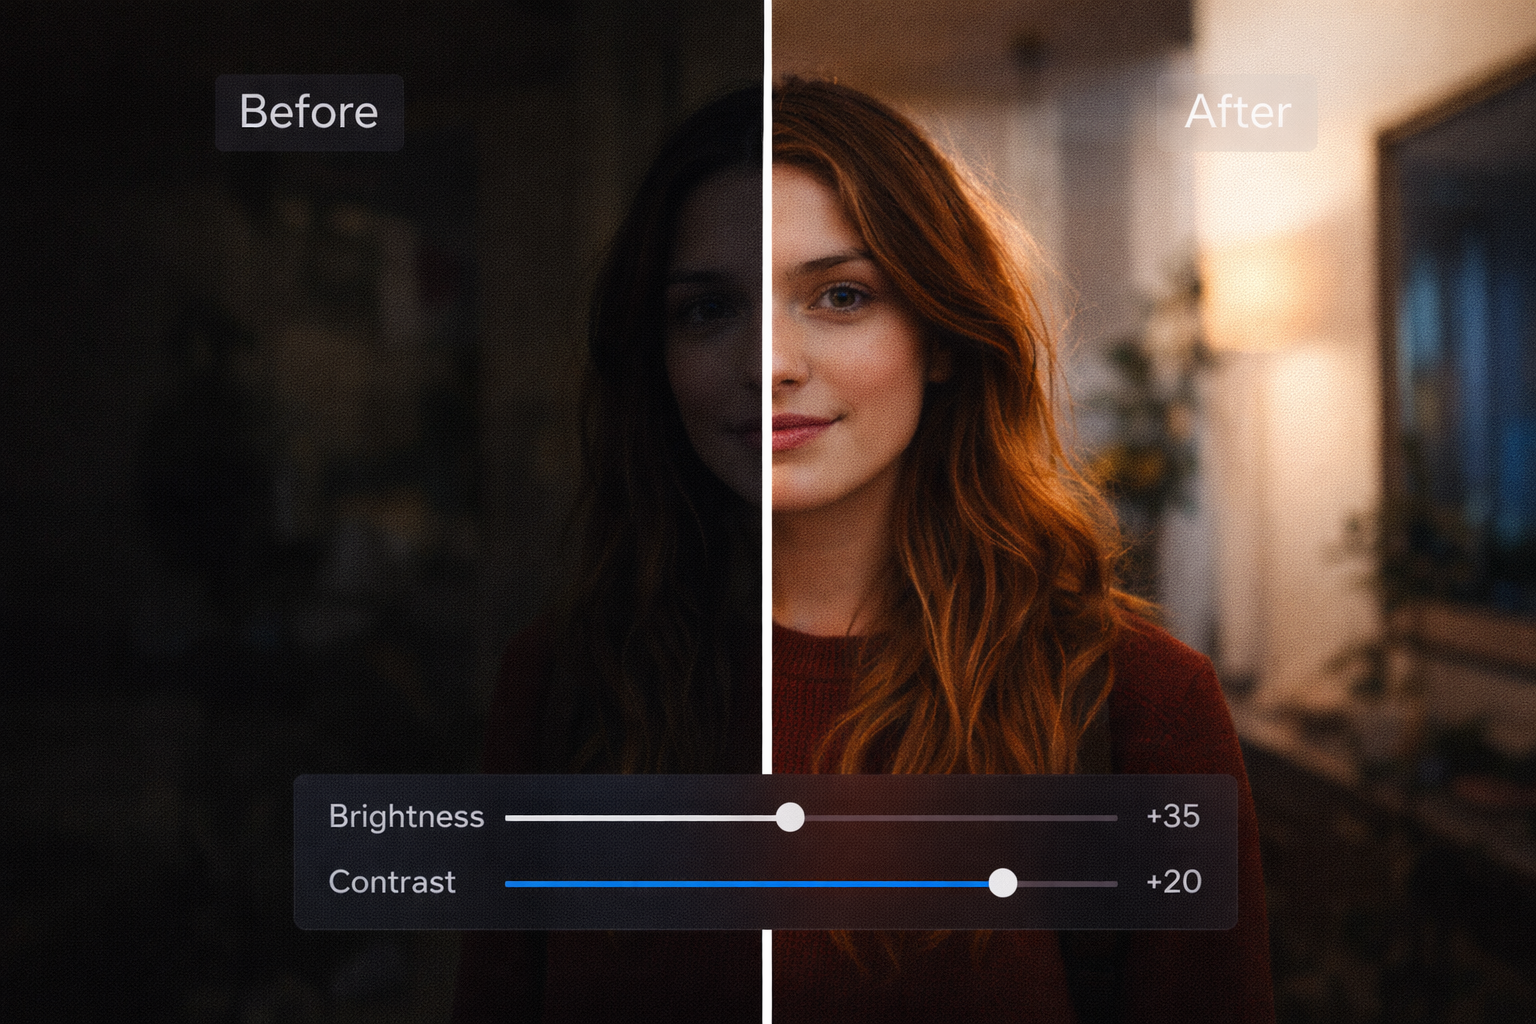
Table of Contents
Why Brightness and Contrast Matter So Much
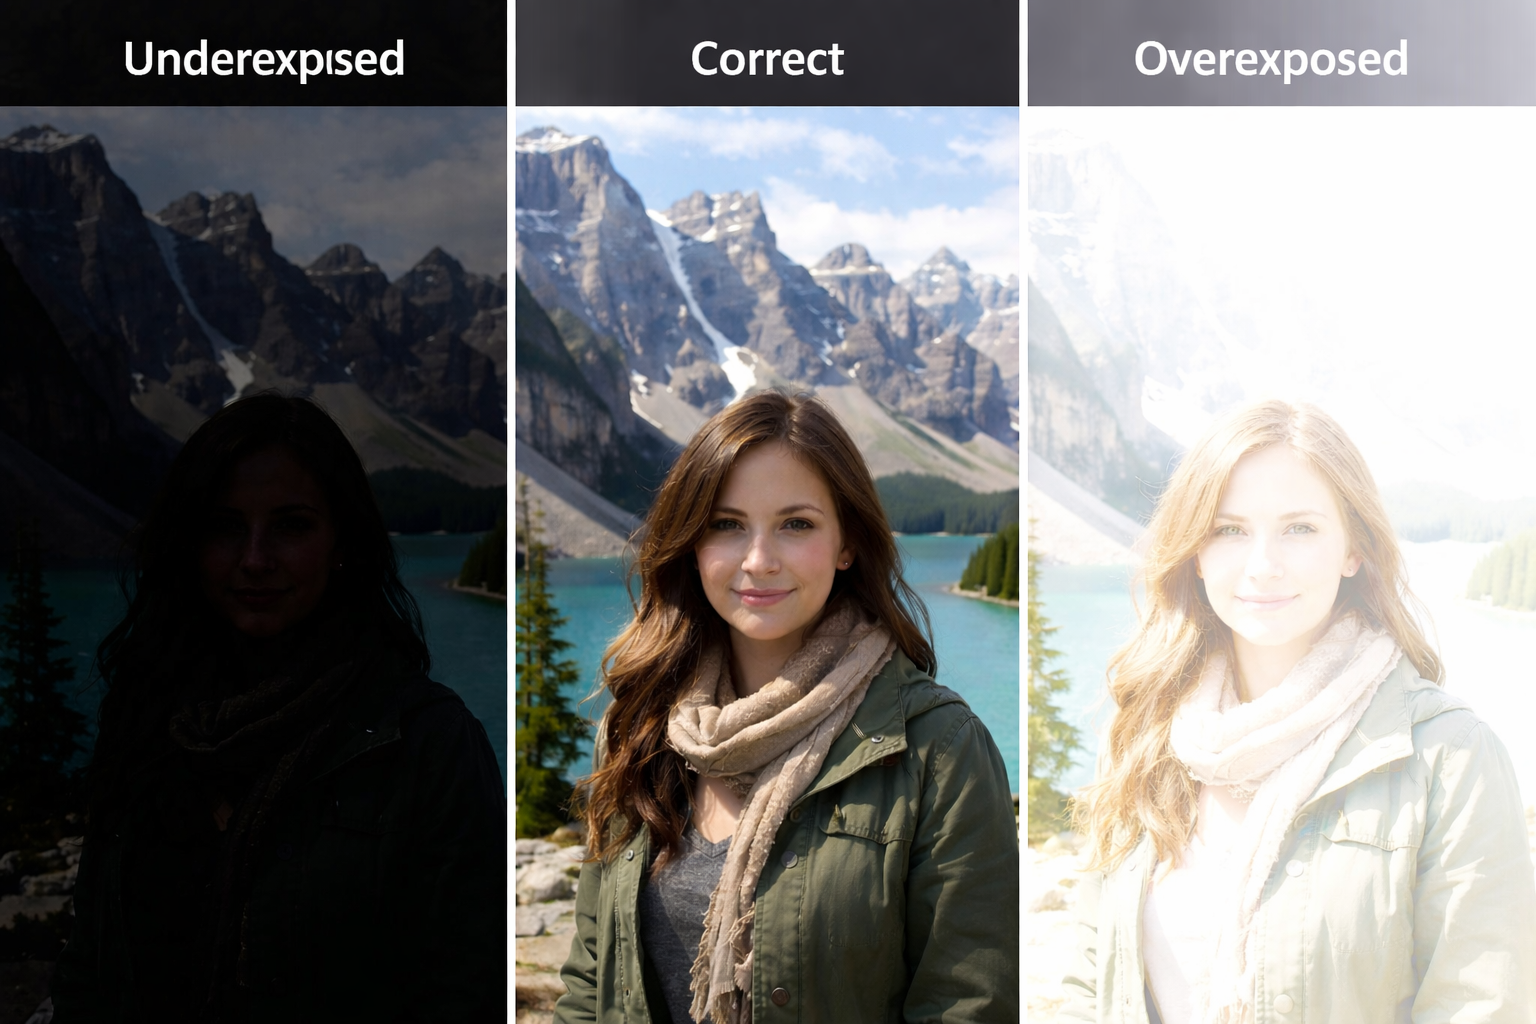
Most disappointing photos don't have a problem with framing, subject, or timing — they have a lighting problem. A photo taken with the best intentions indoors, at a party, on an overcast day, or with your phone at night often comes out dark, low-contrast, and washed out. The content is there; what's missing is the lighting correction.
Adjusting brightness and contrast is the most direct way to recover those photos. It's also the starting point of any professional editing workflow — before applying filters, cropping, or adjusting colors, the lighting needs to be right. A photo with unbalanced light undermines every adjustment that comes after it.
PhotoEditor.Studio offers a complete set of lighting controls — brightness, contrast, exposure, shadows, and highlights — 100% free, directly in your browser, with no installation and complete privacy: your photos never leave your computer.
Understanding Each Lighting Control
Before moving any sliders, it's worth understanding what each control actually does. They may look similar, but each one acts differently on the image:
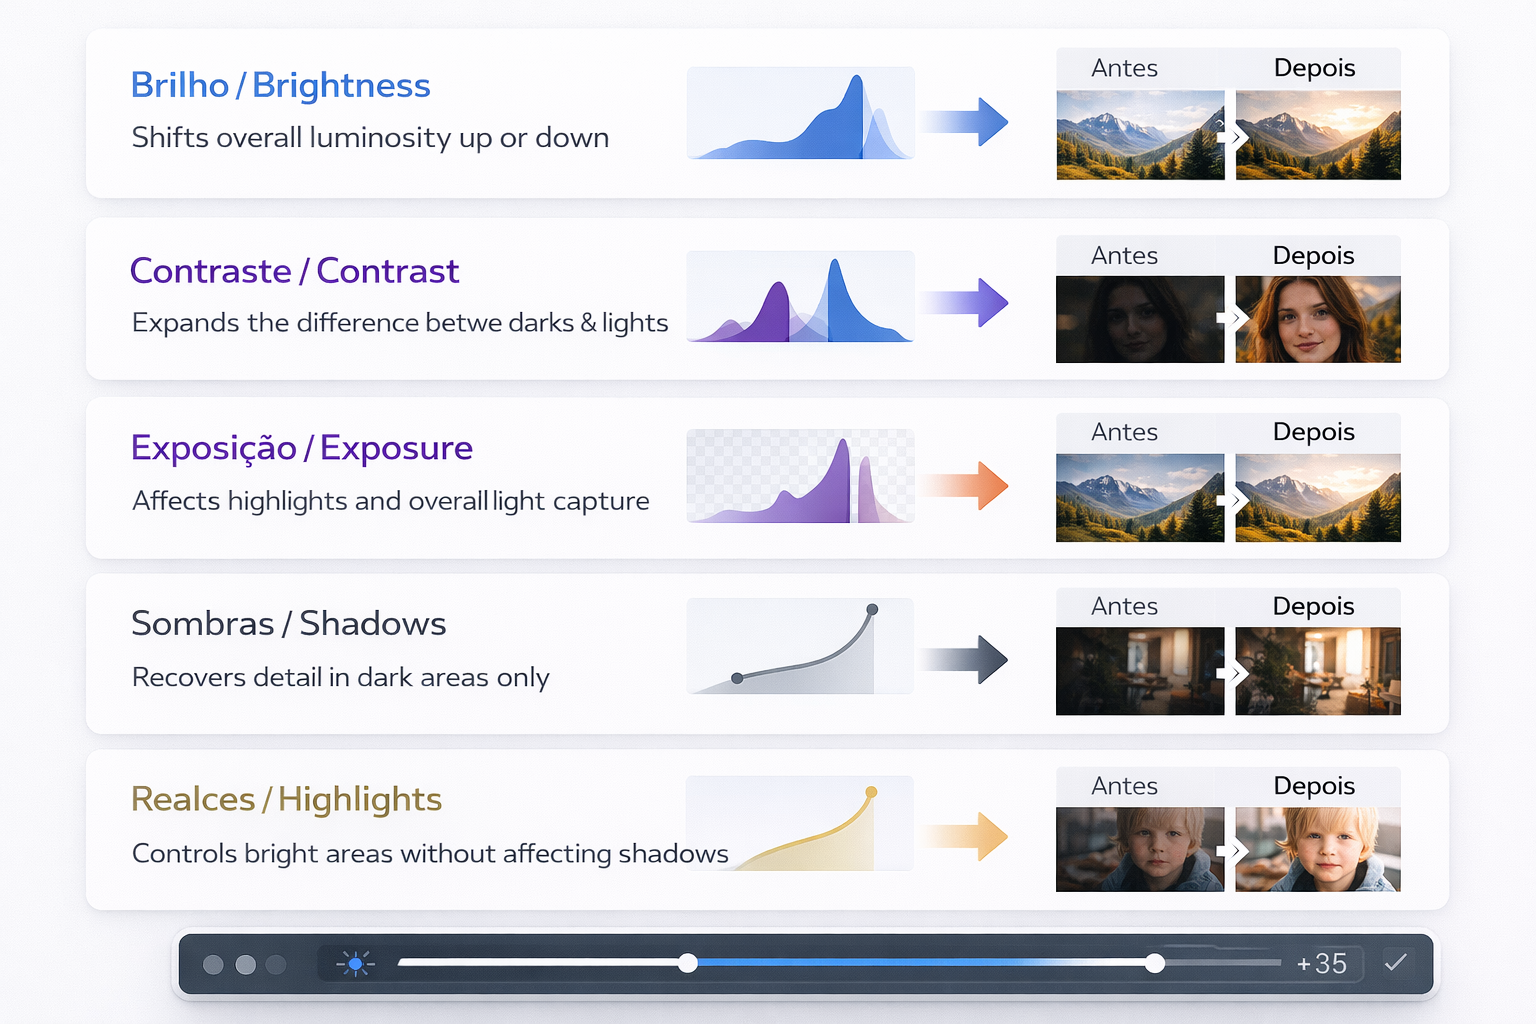
Brightness
The brightness control raises or lowers the overall luminosity of the image uniformly. When you increase brightness, every pixel in the photo gets lighter — shadows, midtones, and highlights all at once. It's the simplest and most blunt adjustment: it fixes dark photos quickly, but can over-brighten already-light areas if pushed too far.
When to use: for slightly dark photos where the entire image needs more light evenly applied.
Contrast
Contrast controls the difference between the dark and light areas of the photo. Increasing contrast makes darks darker and lights lighter at the same time — which gives depth, drama, and presence to the image. Reducing contrast "flattens" the photo, giving it a soft, hazy appearance.
When to use: for photos that look "dead" or lack visual depth — especially shots taken on overcast days or in environments with flat, diffused light.
Exposure
Exposure works similarly to brightness but carries more weight on the brighter areas of the image — it simulates the effect of more or less light reaching the camera sensor. It's a more "photographic" and more subtle adjustment than raw brightness.
When to use: to simulate a re-exposure of the photo, especially when the shot ended up globally too light or too dark during capture.
Shadows
The shadows control acts exclusively on the dark parts of the image, without touching the light areas. Lifting the shadows recovers detail that was hidden in the darkness — faces in backlit situations, clothing details, surface textures. It's one of the most useful controls in modern photo editing.
When to use: when the photo has good overall brightness but the dark areas are too closed — especially in backlit or side-lit shots.
Highlights
Highlights control the brightest parts of the image without affecting the shadows. Reducing highlights recovers detail in overexposed areas — a blown-out white sky, a washed-out window, a flash reflection. Increasing highlights intensifies the brightness of areas that are already light.
When to use: when the photo has good shadows but the bright areas are "blown out" — with no visible detail in the brightest parts.
How to Adjust Brightness and Contrast in PhotoEditor.Studio: Step by Step
Step 1: Open the Editor and Import Your Photo
Go to PhotoEditor.Studio and import your image:
- Drag and drop the file directly onto the editor area
- Click "Select Images" to open your file browser
- Supports JPEG, PNG, WEBP, and GIF
Your photo opens on the canvas at its full original resolution. The editor makes no changes to the image during import.
💡 Tip: Always work with the highest-resolution original available. The more image data the editor has to work with, the better the final result of your adjustments.
Step 2: Open the Lighting Controls Panel
In the left-hand sidebar, find the lighting controls section. You'll see sliders for Brightness, Contrast, Exposure, Shadows, and Highlights, each with a scale from -100 to +100 (or -5 to +5 for exposure in stops).
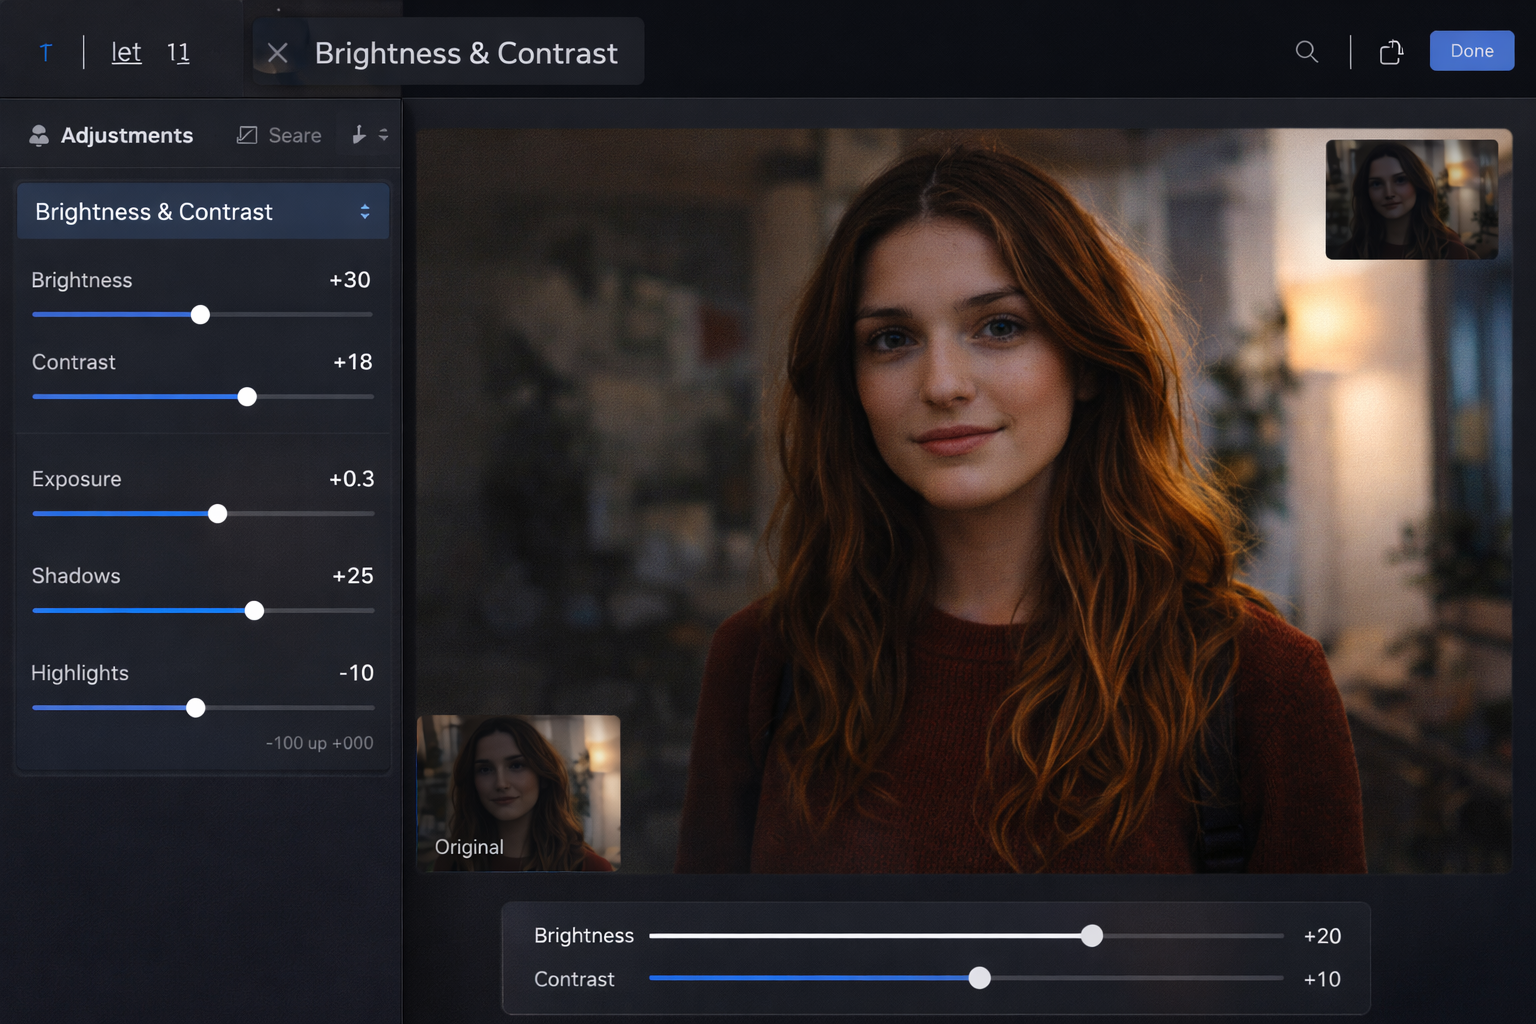
Every adjustment is visualized in real time on the canvas as you drag the sliders. There's no rendering delay — the image responds instantly to every movement.
Step 3: Start by Diagnosing the Photo
Before touching any slider, look carefully at the photo:
- Is the photo dark overall? → Start by raising Brightness or Exposure
- Are the shadows too closed but the rest looks fine? → Use Shadows to lift only the dark areas
- Does the photo look "flat" or lifeless? → Increase Contrast
- Are there blown-out white areas with no detail? → Reduce Highlights
- Is the photo too bright or washed out? → Lower Brightness or Exposure
This diagnosis prevents guesswork and ensures each control is used with purpose.
Step 4: Apply Adjustments in Logical Order
The order of adjustments matters. Use this sequence for the best results:
- 1st — Exposure: correct the overall light level first. A very dark or very bright photo needs this adjustment before anything else.
- 2nd — Highlights: if there are blown-out areas, reduce highlights to recover detail before continuing.
- 3rd — Shadows: lift shadows to reveal details in the dark parts of the image.
- 4th — Contrast: now that the light distribution is more balanced, add contrast to restore depth and presence.
- 5th — Brightness: if needed, make a final global brightness fine-tune.
💡 Pro tip: The most powerful combination for dark smartphone photos is: Exposure +0.3 to +0.7 + Shadows +20 to +40 + Contrast +10 to +20. This trio recovers hidden detail, balances the lighting, and restores depth — without over-brightening the areas that were already well-lit.
Step 5: Combine with Other Adjustments (Optional)
After correcting the lighting, you can follow up with:
- Saturation or Vibrance — brightness-corrected photos often reveal more vivid colors than the original appeared; a small saturation boost can amplify them
- Noise Reduction — photos taken in low light that have been brightened tend to reveal more grain; apply denoise to clean up the result. See our noise reduction guide
- Crop and composition — with the lighting corrected, the ideal framing is much easier to evaluate
Step 6: Export Without Watermarks
When the result looks right:
- Click "Export"
- Choose your format: JPEG (general use), PNG (lossless), WEBP (web)
- The file downloads directly to your computer — no watermark, no upload, no waiting
Professional Tips for Lighting Correction
Don't Rely Only on Brightness
The most common beginner mistake is using only the brightness slider for everything. The problem is that brightness affects the entire image uniformly — it brightens shadows and highlights at the same time, which can result in a washed-out, low-contrast photo.
In most cases, the combination of Shadows + Contrast delivers a far more natural and professional result than simply cranking up the brightness.
Use Shadows to Reveal Detail Without Brightening Everything
The shadows control is especially powerful for portraits, product photos, and any image with backlit or side-lit subjects. Lifting shadows to +20 to +35 typically reveals the detail that was hidden without affecting the already well-lit parts of the photo.
Balance Highlights and Shadows to Compress Dynamic Range
A classic professional technique is to gently lift shadows and slightly lower highlights at the same time (+20 shadows, -10 highlights). This compresses the dynamic range of the photo and creates a more "cinematic" look with visible detail in both the dark and bright areas.
Evaluate in the Destination Context
A photo that looks perfectly lit on your computer screen may look different on a smartphone (phone screens are often significantly brighter) or when printed. If you know where the image is going, calibrate your brightness accordingly: for print, slightly more contrast; for mobile screens, slightly less brightness.
Don't Overdo the Contrast
Too much contrast creates artificially dark shadows and artificially bright highlights — the photo loses its naturalness and looks over-processed. For most everyday photos, a contrast between +10 and +25 is enough to add presence without looking heavy-handed.
Common Mistakes When Adjusting Brightness and Contrast
Over-correcting Dark Photos
When a photo is very dark, the temptation is to push brightness up until it looks good. The problem is that going too far creates new blown-out areas — parts of the image that become completely white with no detail. Prefer gradual corrections: raise brightness until the photo looks natural, not until it looks over-lit.
Skipping Separate Shadow and Highlight Controls
Many people only adjust brightness and contrast without using the shadow and highlight controls. This severely limits what's possible — especially in photos with high light contrast (backlighting, windows, flash). The separate controls enable surgical corrections that global brightness simply cannot achieve.
Applying the Same Values to Different Photos
There's no universal set of values that works for every photo. A bright beach shot needs completely different adjustments than a candlelit dinner photo. Evaluate each image individually and adjust according to its specific diagnosis.
Use Cases: When to Adjust Brightness and Contrast
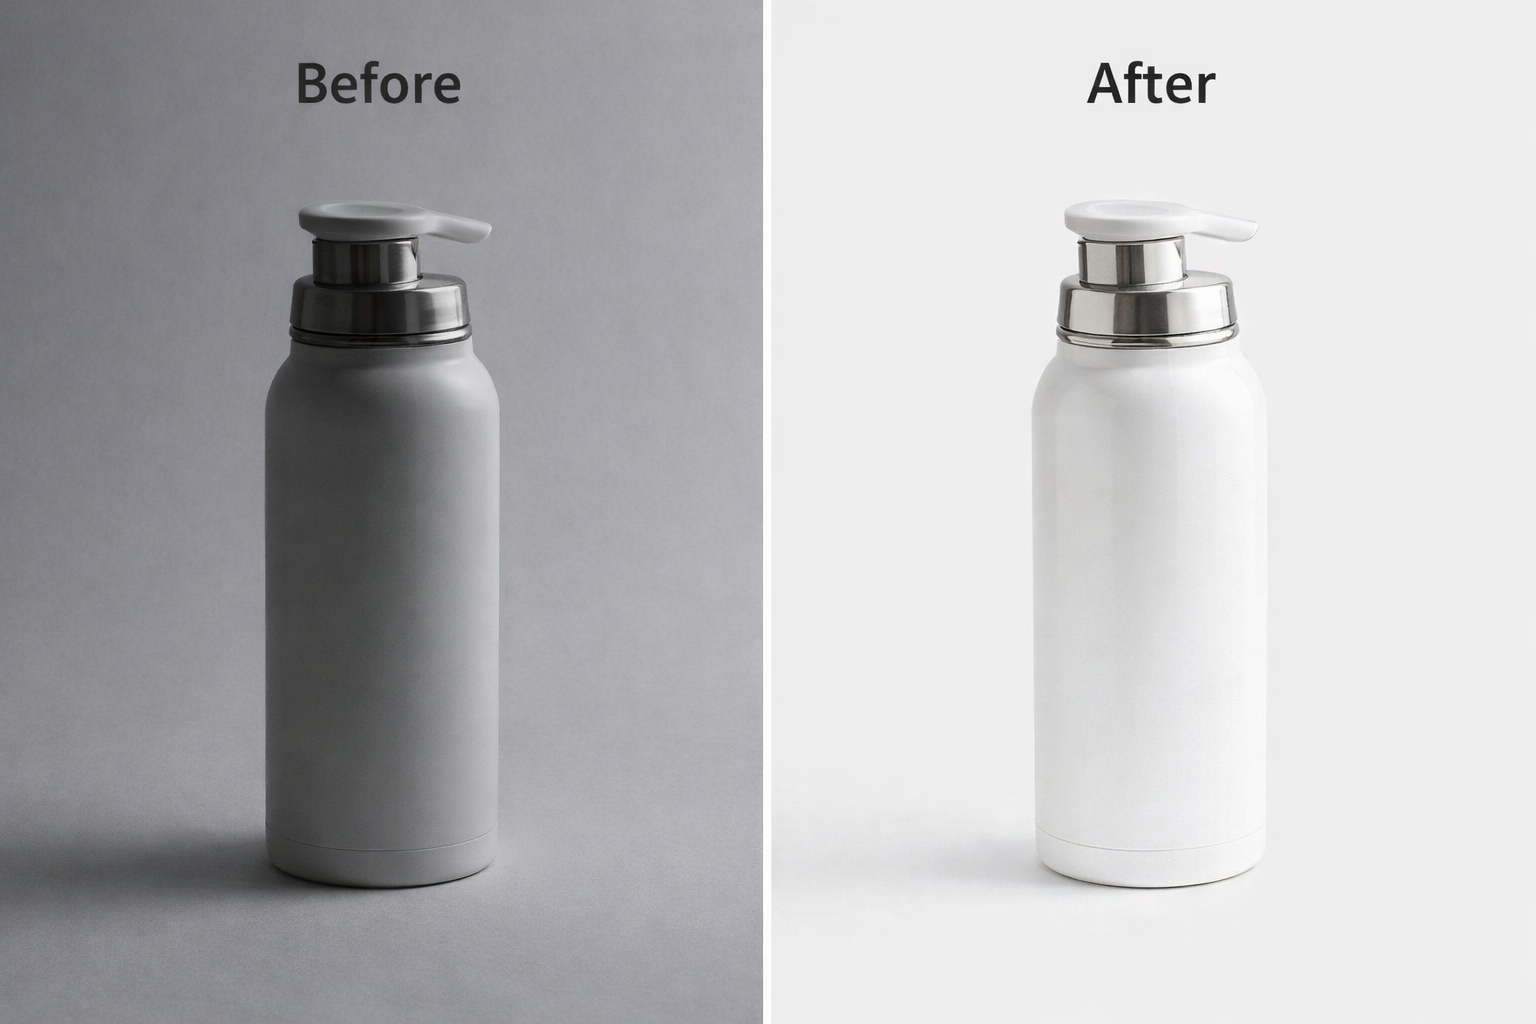
Product Photos for E-commerce
Product shots need a clean white background and a well-lit product — two things that rarely come out perfect straight from a home camera setup. Brightness and exposure adjustments clean up the background; lifting shadows reveals product details that were lost in the dark.
Portraits and Photos of People
Underexposed faces lose expression and detail. Lifting shadows in portraits is particularly effective for revealing eye detail and skin texture without brightening the whole photo. Adding a gentle contrast boost restores the visual presence and impact of the subject.
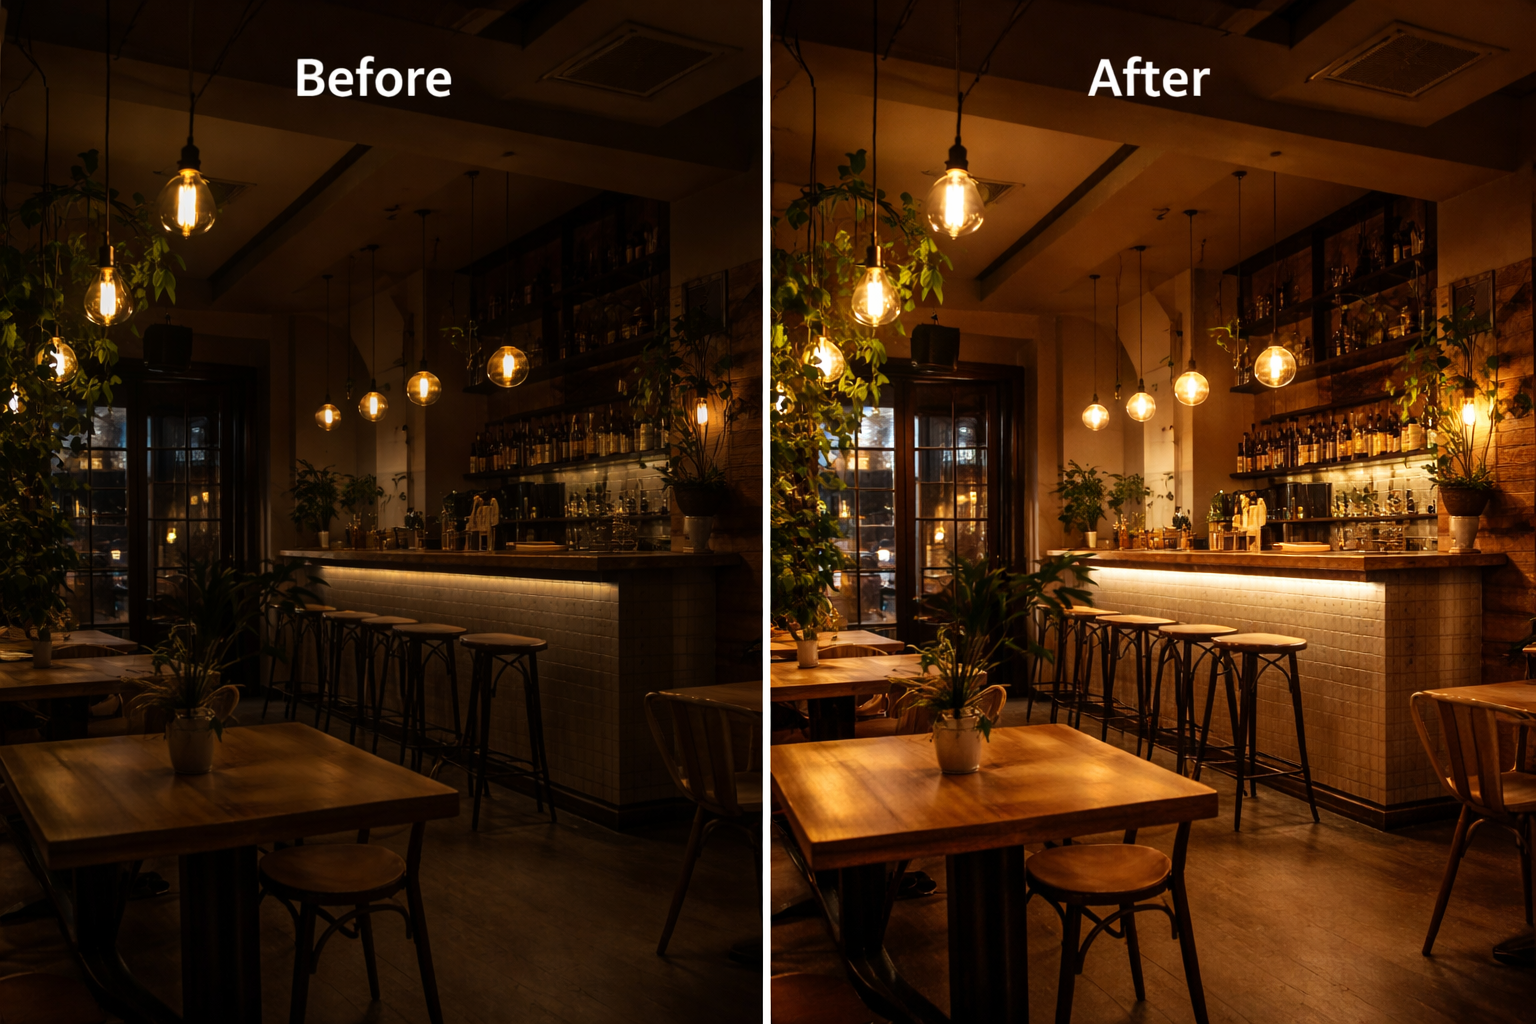
Night and Indoor Photos
Low-natural-light environments — restaurants, concerts, parties, indoor spaces at night — are the biggest candidates for brightness correction. The combination of exposure + shadows + noise reduction is the standard workflow for rescuing these shots.
Travel Photos on Overcast Days
Cloudy days produce flat, diffused light that results in low-contrast, washed-out photos. A solid contrast boost (+15 to +25) and slight color intensification completely transforms the look of these images — without needing elaborate filters.
Photos for Social Media
For Instagram, Pinterest, and other visual platforms, photos with good brightness and contrast consistently get more engagement. To learn more about preparing complete photo edits for social media, see our Instagram photo editing guide.
Supported Export Formats
PhotoEditor.Studio accepts and exports the main image formats:
- JPEG — Smallest file size
- PNG — Lossless quality
- WEBP — Web standard 2026
- GIF — Simple images
PhotoEditor.Studio vs Other Tools
| Feature | PhotoEditor.Studio | Lightroom | Snapseed | Fotor |
|---|---|---|---|---|
| 100% Free | ✅ Always | ❌ Subscription | ✅ Free | ⚠️ Freemium |
| No Installation | ✅ Browser | ❌ Desktop/app | ❌ Mobile app | ✅ Browser |
| Local Privacy | ✅ Full | ⚠️ Cloud | ❌ Upload | ❌ Upload |
| Shadows & Highlights | ✅ Included | ✅ Advanced | ✅ Included | ⚠️ Limited |
| Batch Editing | ✅ Free | ✅ Paid | ❌ No | ⚠️ Paid |
| No Sign-up Required | ✅ None needed | ❌ Required | ❌ Required | ❌ Required |
Frequently Asked Questions About Adjusting Brightness and Contrast
What's the difference between brightness and exposure in the editor?
Brightness raises or lowers the luminosity of all pixels uniformly — a simple, direct adjustment. Exposure simulates the effect of more or less light reaching the sensor, with greater influence on the midtones and highlights. For subtle corrections, exposure tends to produce more natural results; for quick fixes, brightness is more intuitive.
Can I recover a completely dark photo?
It depends on the extent of the problem. Mildly to moderately underexposed photos can be fully recovered using the brightness, exposure, and shadows controls. Very dark photos — where the shadows are "crushed" with no recoverable detail — can be brightened, but the result will have more noise and less detail than a well-exposed original.
Does adjusting brightness and contrast reduce image quality?
In JPEG images, each edit-and-resave cycle introduces slight quality loss through compression. To minimize this, make all your adjustments at once before exporting — don't save intermediate JPEG versions. For maximum quality, work from a PNG or export to PNG before the final product.
Does the editor handle high-resolution photos well (DSLR, mirrorless)?
Yes. PhotoEditor.Studio processes high-resolution images directly in the browser using your computer's resources via Web Workers. Processing is entirely local — there's no file size limit imposed by a server. For very large files (50MB+), we recommend using a computer with a good amount of available RAM.
Can I adjust the brightness of multiple photos at once?
Yes. Use PhotoEditor.Studio's batch editing mode — import multiple photos, configure the brightness and contrast settings once, and apply them to all. Ideal for photo sessions, product catalogs, or any set of photos taken under the same lighting conditions. Learn more in our batch editing guide.
Does it work on mobile?
Yes. The editor is fully responsive and works in modern mobile browsers on Android (Chrome) and iOS (Safari). You can adjust brightness and contrast on your phone before posting.
Ready to Fix Your Photos' Lighting?
Try it now and see how PhotoEditor.Studio's brightness, contrast, and exposure controls transform dark or flat photos into professional-quality images.
Open Free Photo Editor →