How to Reduce Noise in Photos Online: Remove Grain for Free (2026)
Learn how to reduce noise and grain in photos online for free. Remove digital grain from dark or smartphone images directly in your browser — no installation, no watermarks.
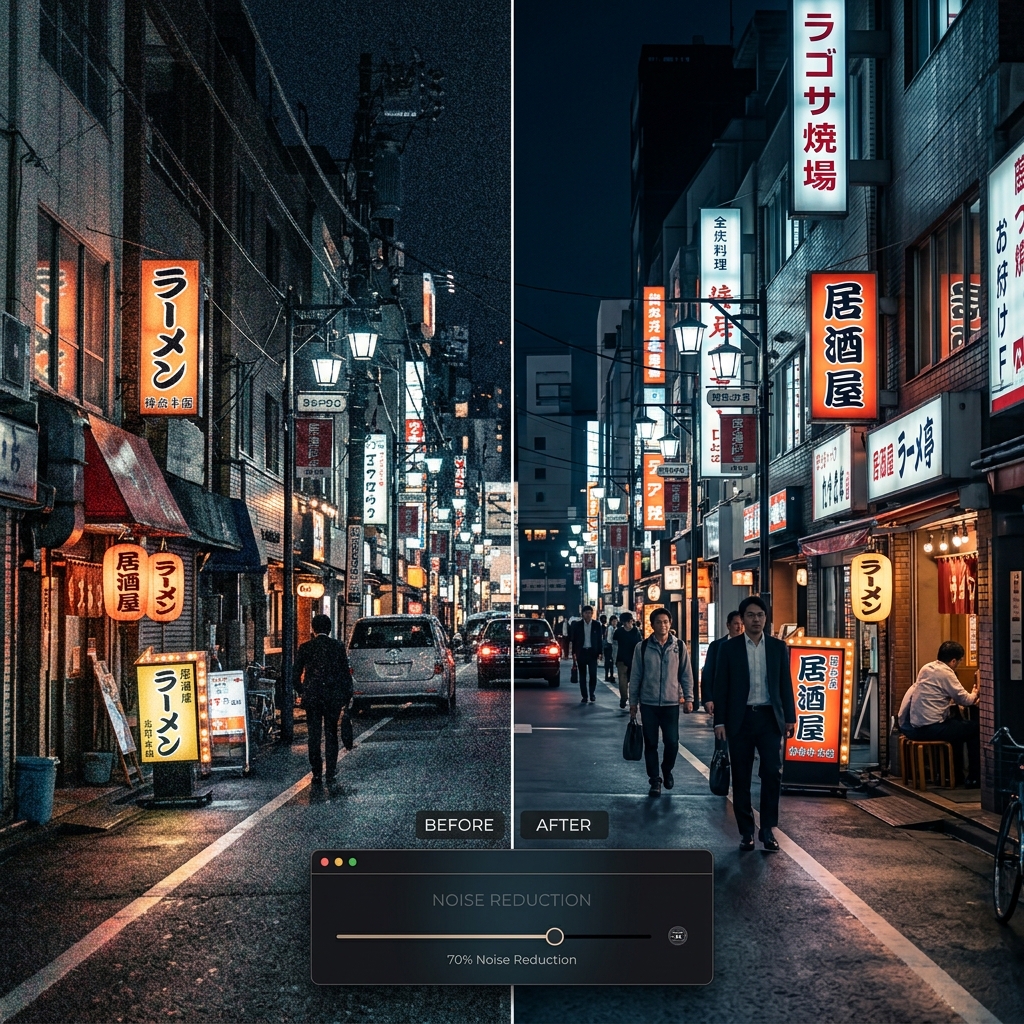
Table of Contents
What Is Digital Noise in Photos?
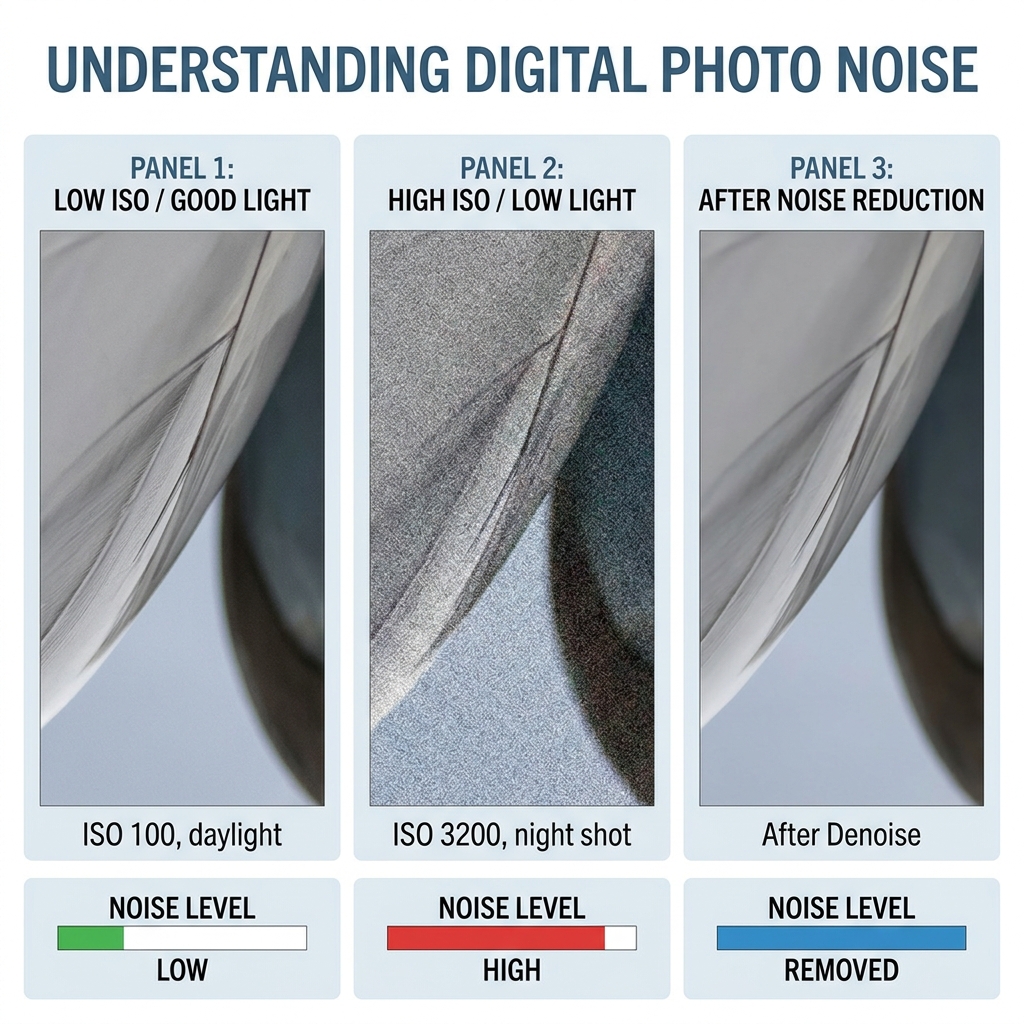
Digital noise — also called grain — is that rough, speckled texture that appears in photos taken in low light or with a high ISO setting. Instead of smooth, uniform areas of color, you see a "haze" of random pixels that destroys sharpness and overall image quality.
Digital noise is one of the most common problems in modern photography — particularly with smartphone cameras, which have tiny sensors that struggle to gather enough light in dark environments. The result is a shot that looked great on your phone screen in the moment, but turns out grainy and muddy when you see it on a larger display.
With PhotoEditor.Studio, you can remove that noise directly in your browser — completely free, no installation required, and with full privacy: no photo is ever uploaded to an external server.
Why Do Photos Get Grainy?
Understanding where noise comes from helps you avoid it during capture — and treat it more effectively in editing. The most common causes:
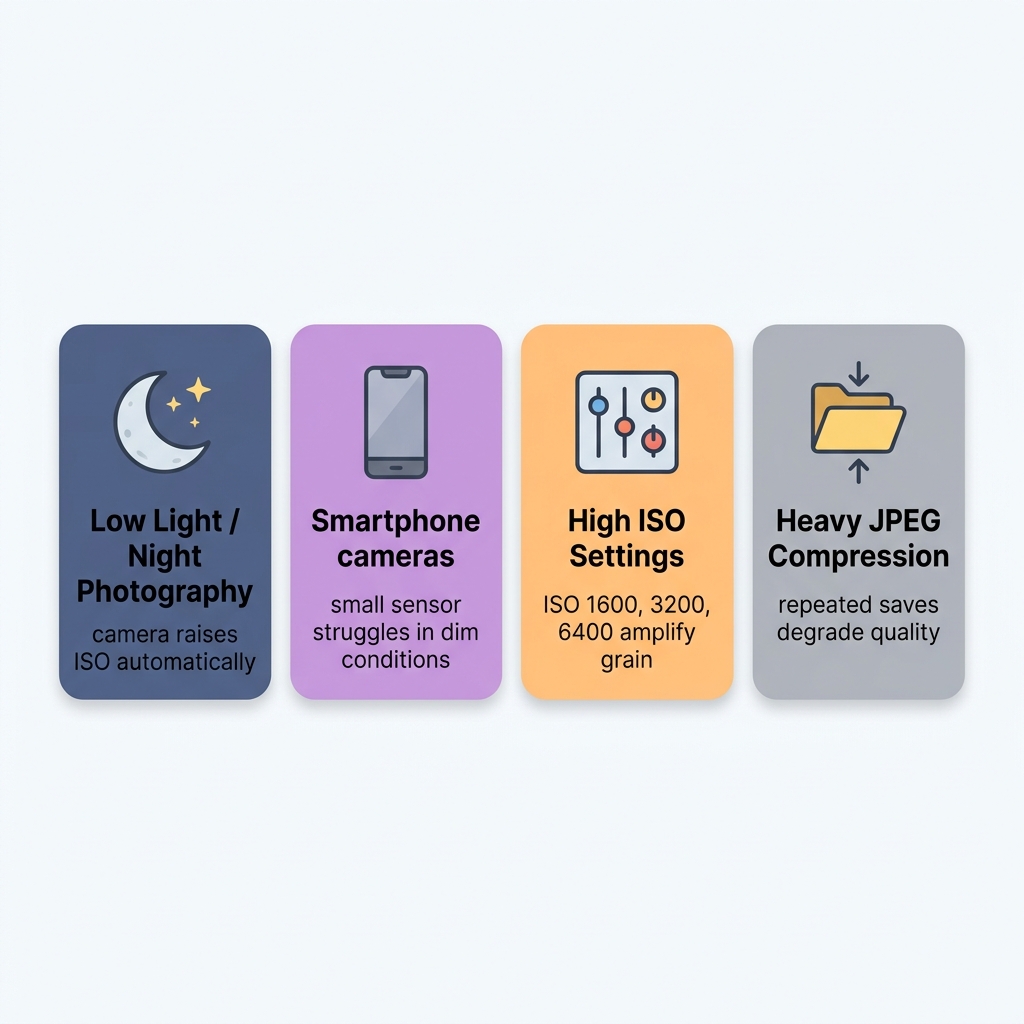
- Low ambient light: When there isn't much light, the camera sensor has to amplify the electrical signal it captures. That amplification introduces random variations — noise. It's the same principle as turning up the volume on a quiet audio recording: you amplify the signal, but also amplify the background hiss.
- High ISO settings: ISO is the sensor's sensitivity to light. The higher the ISO (800, 1600, 3200, 6400+), the more the sensor amplifies the signal — and the more noise is generated. Entry-level cameras and smartphones raise ISO automatically in dim conditions, often without the photographer noticing.
- Small smartphone sensor: Larger sensors capture more photons of light per pixel, producing cleaner images. The tiny sensors in smartphones perform significantly worse in low light — which is why night shots from a phone are almost always noisy.
- Heavy JPEG compression: Saving an image as a low-quality JPEG, or re-saving the same file multiple times, introduces compression artifacts that look similar to noise and further degrade image quality.
- Long exposures: Exposures of several seconds or more generate a specific type of noise called thermal noise or hot pixels — isolated bright dots that appear in dark areas of the image.
Types of Noise: Luminance and Color
Not all noise is the same. There are two main types, and each responds slightly differently to treatment:
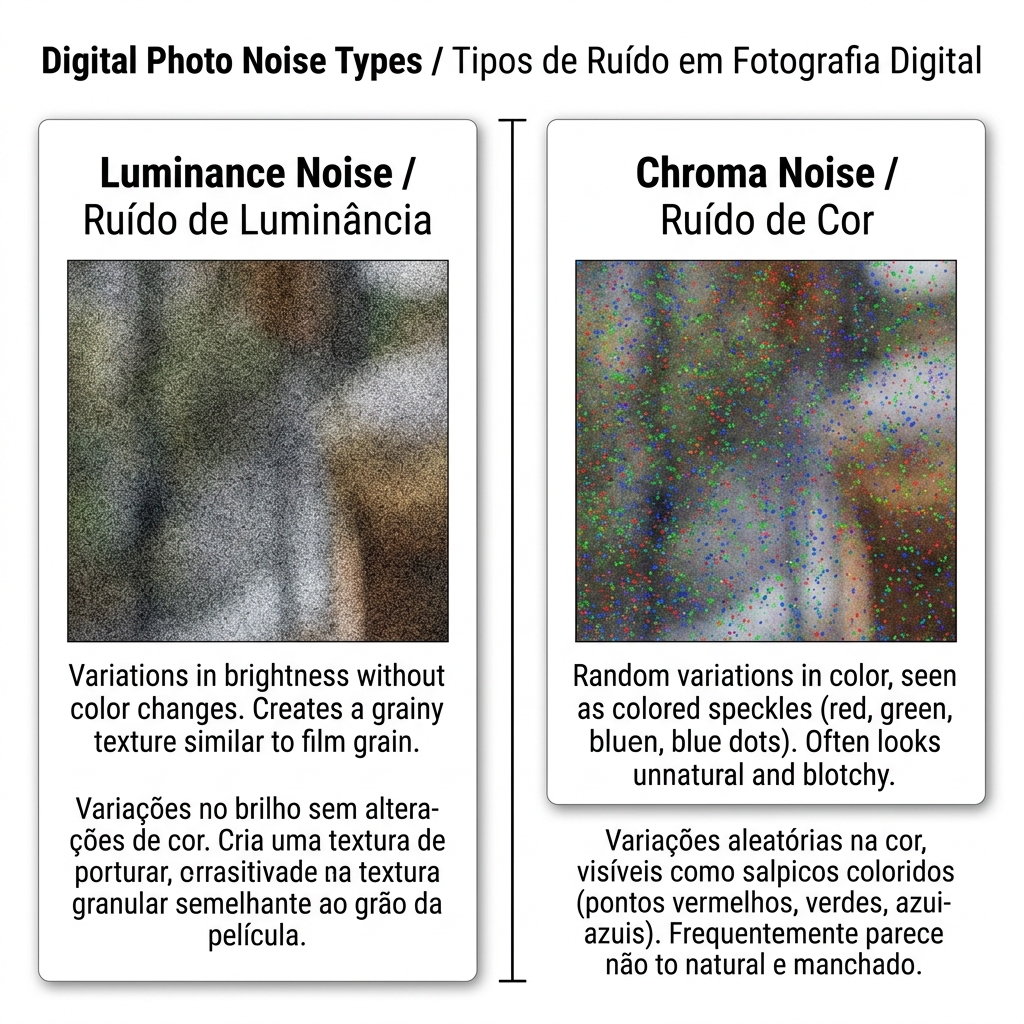
Luminance Noise
The most common type — appears as a grainy, textured pattern in shades of gray, similar to the grain on analog film. The image looks rough and textured, but the colors remain relatively accurate. In controlled amounts, luminance noise can actually have an aesthetic appeal — it's the basis of the "film grain" look used in creative editing.
Chroma Noise (Color Noise)
Appears as random colored speckles — red, green, and blue pixels scattered irregularly across the image. It's more visually disruptive than luminance noise because it creates patches of color where there shouldn't be any. Smartphone photos taken in very dark conditions often exhibit both types simultaneously.
PhotoEditor.Studio's noise reduction slider handles both types intelligently, removing grain without destroying the edges and fine detail of the image.
How to Reduce Photo Noise Online: Step by Step
The whole process takes under a minute. Here's how it works:
Step 1: Open the Editor and Import Your Photo
Go to PhotoEditor.Studio and import your noisy image:
- Drag and drop the file directly onto the editor area
- Click "Select Images" to open your file browser
- Supports JPEG, PNG, WEBP, and GIF
Your photo opens on the main canvas at its original resolution. The editor doesn't compress or alter the image during import.
💡 Tip: Always work with the highest-resolution original available — never with a version that's already been compressed or downsized. The more image data available, the better the noise reduction result.
Step 2: Find and Adjust the Noise Reduction Slider
In the left-hand panel, look for the "Noise Reduction" section (particle or denoise icon). You'll see a slider ranging from 0 (no effect) to 100 (maximum reduction).
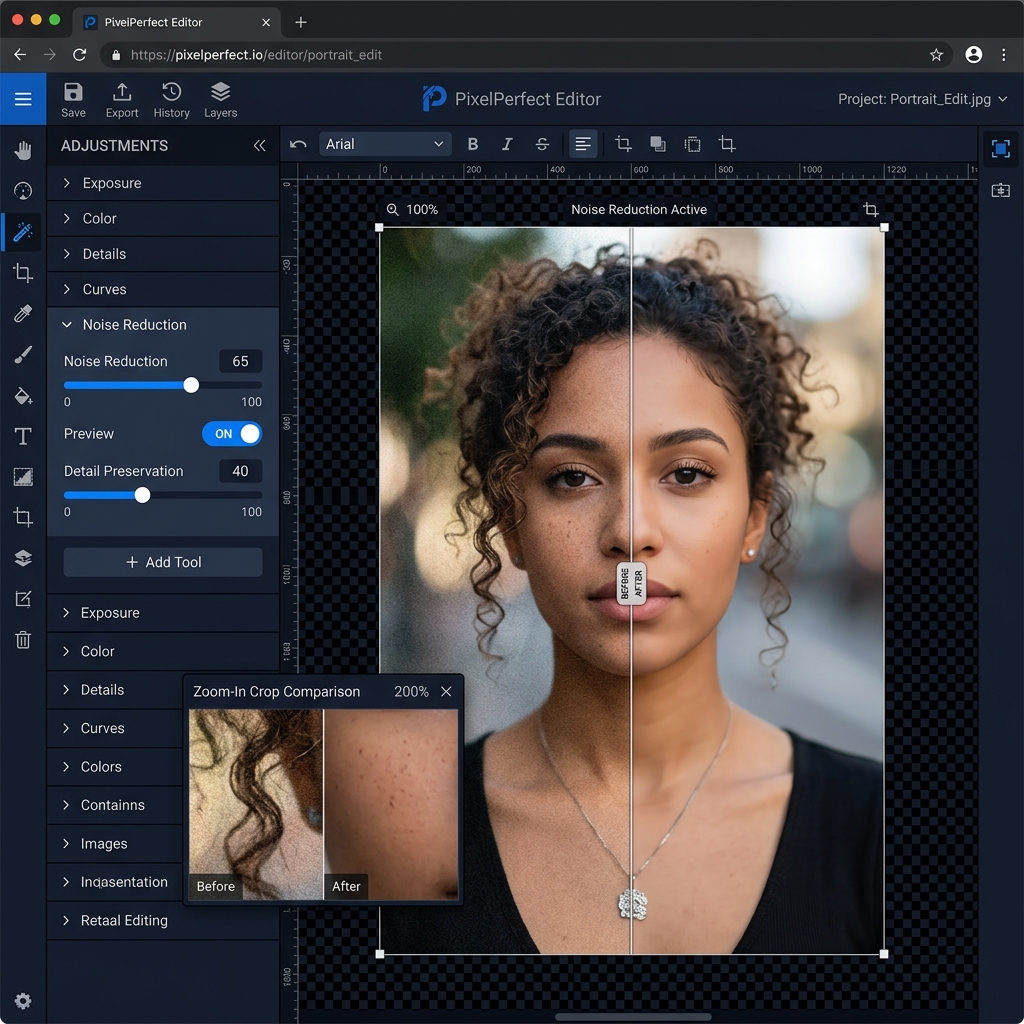
How to calibrate the slider:
- 0 to 30 — Light: Best for mildly noisy photos taken at medium ISO (800–1600). Removes fine grain without over-smoothing details.
- 30 to 60 — Moderate: For photos with visible noise from low-light or high-ISO shooting (ISO 3200). Good balance between cleanup and detail preservation.
- 60 to 85 — Heavy: For very grainy photos taken at night or with older smartphones. Results in a smoother image — best when overall cleanliness matters more than fine detail.
- 85 to 100 — Maximum: For extreme cases or when a deliberately smooth, painterly effect is the goal. Use sparingly on realistic photos.
💡 Pro tip: Enable real-time preview and watch the effect on the canvas as you drag the slider. Zoom into a critical area — a face, a product texture, fine hair detail — to evaluate the result precisely before committing.
Step 3: Combine with Other Adjustments (Optional)
After reducing noise, photos can sometimes feel slightly softer. You can compensate with:
- A gentle boost to clarity or contrast to recover the perception of sharpness
- A brightness adjustment if the photo appears slightly darker after denoising
- A saturation or vibrance bump if the colors feel a little muted after cleanup
All of these adjustments are available in the same editor — no need to switch tools.
Step 4: Export Without Watermarks
When the result looks right:
- Click "Export"
- Choose your format: JPEG (general photos), PNG (maximum quality), WEBP (web-optimized)
- The file downloads directly to your computer — no upload, no waiting, no watermark
Tips to Preserve Detail While Reducing Noise
The main pitfall of noise reduction is over-smoothing: removing grain so aggressively that the image loses important texture and detail — skin that looks plastic, hair that turns into a smeared blob, fabric that loses its weave. Here's how to avoid it:
Start Low and Work Up
Always begin with a lower value (around 30–40) and increase gradually until you find the right balance for each photo. There's no single correct setting — it depends on the photo, the subject, and where the image will be used.
Zoom In on Critical Areas
Before exporting, zoom in to 100% on the most important parts of the photo — eyes in a portrait, texture in a product shot, architectural detail in a landscape. If those elements still look defined, you've found a good result.
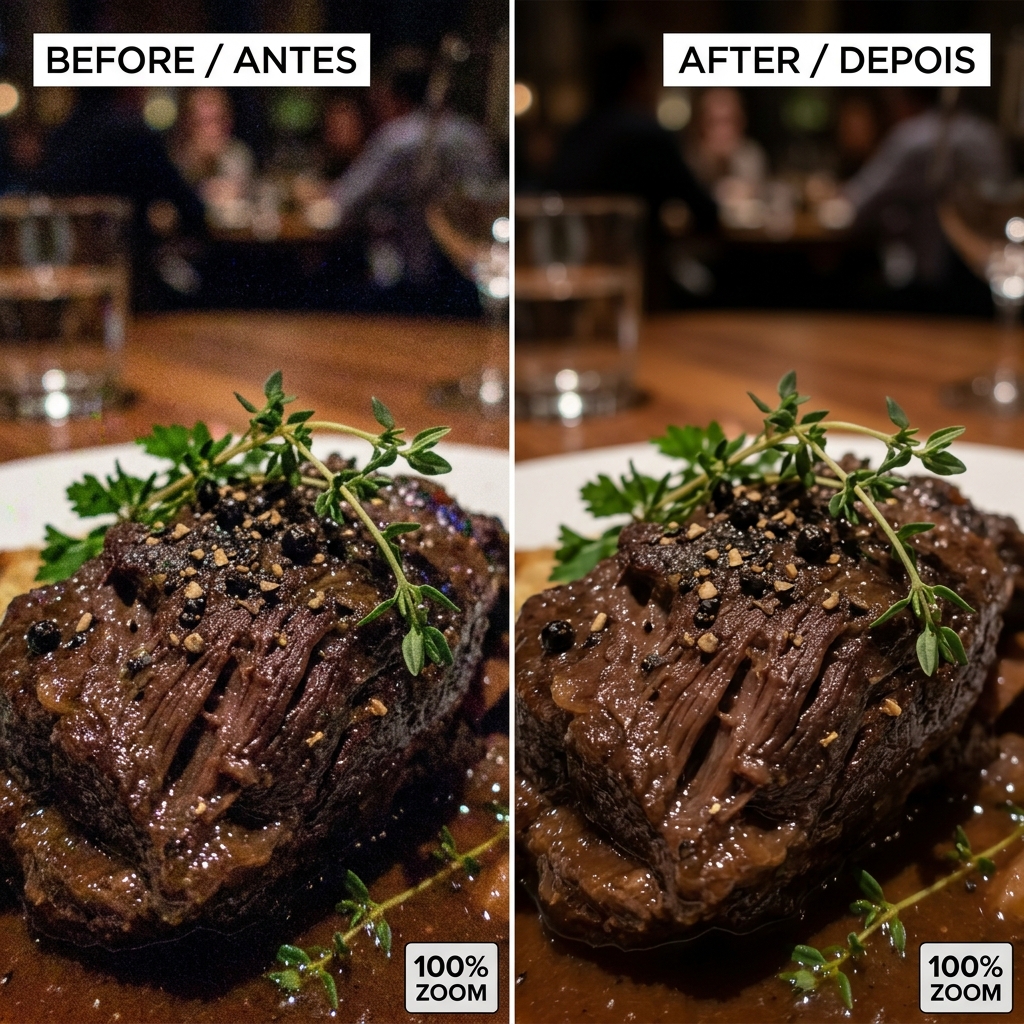
Use the Before/After Comparison
Toggle the comparison view in the editor to switch between the original and treated version. This makes it easy to spot whether you've gone too far — or whether there's still residual grain that needs more attention.
Follow Up with Contrast
If the photo feels slightly softer after denoising, add a subtle contrast boost to recover the impression of sharpness without reintroducing noise. This denoise-plus-micro-contrast combination is standard practice in professional editing workflows.
Keep Your Original File
Before exporting the treated version, keep the untouched original somewhere safe. Noise reduction is irreversible in the exported file — if you want to try a different intensity, you'll need the source image to start over.
When Noise Reduction Isn't Enough
The denoise tool is powerful, but it has limits. When noise is severe enough that full removal would destroy the image's detail, consider these alternatives:
- Remove only part of the noise and accept the remaining grain as part of the photo's aesthetic — documentary, journalistic, or analog style
- Convert to black and white: Night photos with heavy grain often look excellent in B&W, where the grain reads as film aesthetic rather than technical failure
- Use the image at a smaller size: A grainy photo at full resolution may look perfectly acceptable when used as a thumbnail or at smaller display sizes on social media
- Combine adjustments: Sometimes boosting contrast and clarity reduces the perceived impact of noise without aggressive denoising
Supported Export Formats
PhotoEditor.Studio accepts and exports the main image formats:
- JPEG — Smallest file size
- PNG — Lossless quality
- WEBP — Web standard 2026
- GIF — Simple images
PhotoEditor.Studio vs Other Noise Reduction Tools
| Feature | PhotoEditor.Studio | Topaz DeNoise AI | Lightroom | Mobile Apps |
|---|---|---|---|---|
| 100% Free | ✅ Always | ❌ ~$80 (purchase) | ❌ Subscription | ⚠️ Freemium |
| No installation | ✅ Browser-based | ❌ Desktop only | ❌ Desktop/app | ❌ App install |
| Local privacy | ✅ Full | ✅ Local | ⚠️ Cloud | ❌ Upload |
| No watermark | ✅ Always | ✅ Yes | ✅ Yes | ❌ Freemium |
| Other adjustments | ✅ Full suite | ❌ Denoise only | ✅ Full suite | ⚠️ Limited |
| Batch editing | ✅ Free | ✅ Paid | ✅ Paid | ❌ Rarely |
Frequently Asked Questions About Noise Reduction
Does noise reduction hurt the sharpness of my photo?
Every noise reduction process involves some degree of smoothing. The challenge is finding the right balance between removing grain and preserving detail. Use the slider gradually and evaluate the result zoomed in to 100% — especially in areas with texture or sharp edges.
Does it work on photos from any camera?
Yes. The tool works with photos from smartphones, point-and-shoots, mirrorless cameras, and DSLRs. Results depend on the severity of the noise and the original image resolution — higher-resolution photos give the algorithm more data to work with, typically leading to better results.
Can I reduce noise in already-compressed photos?
Yes, but with less precise results. Heavily compressed JPEG files have compression artifacts on top of the noise. The editor will reduce both, but the final quality depends on the information available in the original file.
Does the editor upload my photos anywhere?
No. All processing — including noise reduction — happens locally in your browser, using your own computer's resources. No image is ever sent to our servers at any stage.
Can I apply noise reduction to multiple photos at once?
Yes. PhotoEditor.Studio includes batch editing — import multiple photos, set the denoise intensity, and apply it to all at once. Learn more in our batch photo editing guide.
Does it work on mobile?
Yes. The editor is fully responsive and works in modern mobile browsers on Android (Chrome) and iOS (Safari). For very large images, we recommend a device with a healthy amount of available RAM.
Ready to Clean Up Your Photos — For Free?
Try it now and see how noise reduction transforms grainy, dark shots into professional-quality images.
Open Free Photo Editor →